
 Careers
Learn How to Backup and Rollback in Magento 2
One of the most important aspects of running any online store is keeping a proper backup of everything so that in case anything goes wrong you can restore it with ease anytime. You can also adjust settings and edit your site without worrying that your web page will go offline. So as you can see, maintaining a backup of the site is pretty important.
The functionality is built-in Magento 2 to ensure that the backup is created of the data and then it can restore all the codes, media and also your site’s database whenever you require it. At times it is a critical task to restore backups.
There are many options available if you desire to make a back up of your site’s data. Through this article, we will guide you in steps how you can do the process of backing your data and then how you can restore it by the use of CLI commands.
So let’s get started!
Before We Begin
Before going further, you must check that you have installed a working Magento 2 beforehand on your system. Now access the installation of your Magento 2 via the shell and you have to use SSH. First login via SSH, after this go to the app which is present at the root folder, bin, var folders are placed of Magento 2.
Backup/Snapshot – How to do it
Once you are done with the step of changing Magento 2 directory to the root of it, install and run the command below:
php bin/magento setup:backup -v –code –media –db
It will create three types of backups which include:
- Code
- Media, for example, the pictures or videos, etc.
- The data’s Database which is of high necessity for your store.
Note that during the backup of your store, as it will change the mode of your site to maintenance mode. During the back up the live site of your store will not be available during backup and all of the backups will be stored in the var/backups
As for the output, it will look similar to this:

a. Here if you only want to backup media, then just omit all the other attributes from the above command and enter the following one instead of the first one:
php bin/magento setup:backup –media
The Magento 2’s media backup is around 153 MB.
b. Otherwise, if you want to only backup database, then go to the shell and there write the mentioned command in where you have started to work.
php bin/magento setup:backup –db
The Magento 2’s database backup is around 14 MB.
c. Finally, in orde to backup the code base only, the following command will do the job:
php bin/magento setup:backup –code
The Magento 2’s code base backup is around 123 MB.
Determining the Backup Files
php bin/magento info:backups:list
This will provide output along with a listed files which are backed up. It will look something like this:

During the whole maintenance mode, Magento 2 system successfully made your site’s backups and those three backups are listed here.
Once the list is generated, you will now determine the backup files. To do this, write the command:
ls -lt var/backups/
It will show all the files that are now in this folder of your Magento 2 system along with their all number of the files. This step is done by us to make it easy for ourselves to view the files that we want to rollback, which is the next section of this tutorial. After you have entered the command the result looks similar to this:

Rollback/Restore – How to do it
Once you have made a backup of your files you can now restore or rollback. Remember whenever you are doing the rolling back process, this means the system will delete the specific files and also database beforehand the system does restores. For this follow the following …
1. You first need to login via SSH (if you haven’t logged in).
2. After logging in, navigate to the var/backups folder where you have all the backup files in your Magento installations. In this step, you have to be sure about the DB i.e the .sql file being in the right folder.
3. Now enter the command on the shell to restore the files, the command will look something like this:
php bin/magento setup:rollback [-c|–code-file=”<name>”][-m|–media-file=”<name>”][-d|–db-file=”<name>”]
a. Here, if you only want to restore the database files, then you can enter the following command in the shell. For instance:
php bin/magento setup:rollback -d 1470820565_db.sql
b. If you only want to restore the media files, then you can enter the mentioned command in the shell. For instance:
php bin/magento setup:rollback -m 1470820565_filesystem_media.tgz
c. Lastly, if you only want to restore the code files, then you can enter the following command in the shell. For example:
php bin/magento setup:rollback -c 1470820565_filesystem_code.tgz
Note: You will change the file name on the command line after -d or -c or -m In this case, the command will be as shown if all three files are being rolled back.
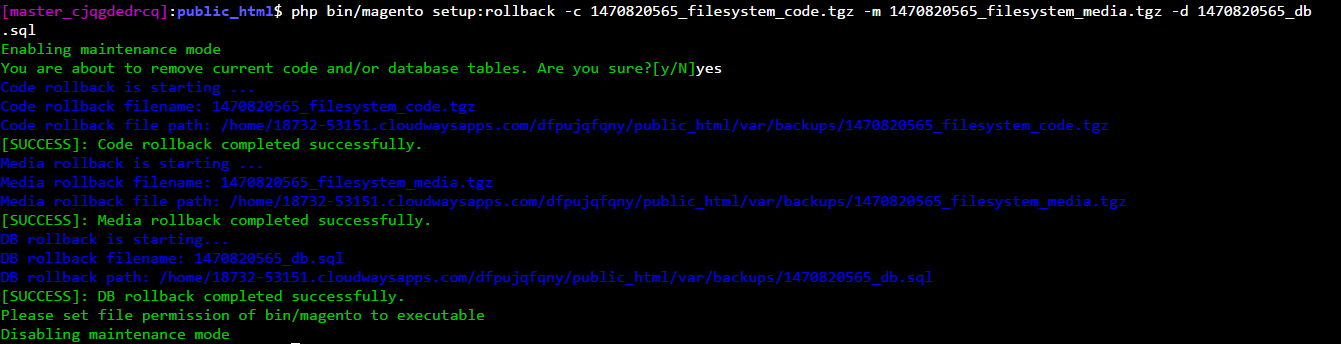
php bin/magento setup:rollback -c 1470820565_filesystem_code.tgz -m 1470820565_filesystem_media.tgz -d 1470820565_db .sql
Once you have entered the above mentioned commands, you will receive an alert from your system about the confirmation regarding the files you selected that do you want to restore these or not.
You have to press just Y in case you want to continue, otherwise to cancel the process or if you want to make changes to anything by navigating back, then you should just enter N.
Once you have entered the command for the file that you want to rollback or all three and pressed Y then the output will be like (in your case it may be a bit different):
In case you receive the segmentation fault while confirmation, you can very easily fix that by using the following command. But the command only runs if you have PHP 7. We think it is a good practice to work on new technologies as soon as they are introduced in the market. The command is…
ulimit -s 65536
Or you can also store this in .bashrc file on your system if you don’t want to enter the command.
Congratulations!
You have now successfully made a backup and restored your files. Now there are some final things to do to make changes effective. Below are some commands that you have to enter to complete the process. Always flush and clean the caches. The commands are…
php bin/magento maintenance:disable
rm -fr var/cache/* var/di/* var/geration/* var/page_cache/*
sudo chmod -R 777 var
php bin/magento cache:flush
php bin/magento setup:static-content:deploy
php bin/magento setup:upgrade
sudo chmod -R 777 var
Scheduling the Backup
In order to schedule the backup of your store, you may be required to set up the cron job. Run the following command to do this…
*/1****php/var/www/html/bin/magento cron:run
Once you have entered this command, you have now successfully created a cron schedule in the Magento 2 database.
Also, you can create a daily, weekly or monthly backup using the frontend of the admin panel of the Magento 2 system. To do so, go to Stores >> Configuration >> Advanced >> System. Now select the Scheduled Backup Settings and enter all the required fields and set up the schedule.
Conclusion
By giving the step by step process, we have made this job easier for you so that you are now able to backup your store easily while restoring it will be like a piece of cake. Although we recommend that you always maintain an up to date backup of your store, this will help you to avoid any bad circumstances from happening. As the saying goes, “A Klingon warrior is always prepared to fight” so be like a true fighter and be prepared beforehand to fight by having your backups in place. You should hope for the best, yet prepare for the worst.
If you are having issues still? We recommend that you ask us or give your feedback in the comments section present below. Do share! Give it a Like! Follow us! 😉
Latest posts by Moiz Khan (see all)
- How to Use AI to Enhance your SEO Strategies? - August 31, 2023
- What You Need to Know About Test Automation in DevOps - August 30, 2023
- 6 Cloud Computing Challenges That Businesses Need to Be Aware of - August 22, 2023


Pingback: Learn How to Backup and Rollback in Magento 2 |...()