
 Careers
How to set up a CDN (Amazon CloudFront) in Magento
To speed up the websites can be sometimes a daunting task, but it can be done easily if you set up your Magento store by using Amazon CDN (CloudFront Content Delivery) Network to serve all the media files, JavaScript and CSS.
CloudFront caches content on servers throughout the world and displays to the viewers based on the locations, to reduce network transmit time, in result to load the page faster.
To setup the CloudFront, one need an AWS account. Once the account sets up, go to AWS management console and select CloudFront and click on “Create Distribution”. This will immediately start the process for creating a custom CDN for the Magento site.
Get Free Help From Professional Magento website development company.
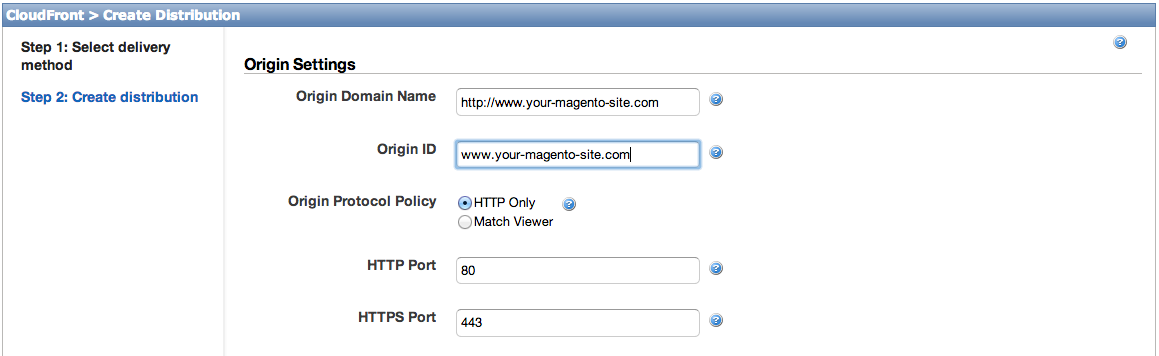
You have to create a “Web” distribution to speed up the distribution of static and dynamic content. Some necessary fields to create the distribution are:
- Origin Domain Name – the actual site name – on which the CloudFront will pull the content from if it’s not cached in the CDN. The Origin ID is Amazon internal ID which will be used to identify the distribution so it should be unique.

- The alternate domain name (CNAME) is the place where you’ll put the URL to pull the content from.
Now click on the Create Distribution and the CloudFront will start creating the CDN.
Time to configure the DNS, go to the distribution which is just created and see for the CloudFront specific domain name. Copy that domain name with the DNS provider, configure the CNAME to point from http://cdn.your-magento-site to the CloudFront domain name.
When you are done with the Cloudfront configuration and the CNAME had propagated, time to test it by loading the image from the site to the browser http://cdn.your-magento-site.com/media/catalog/abc.jpg and use the URL from CDN. The image should be loaded correctly with an additional response header of ‘Via:1.1 abc123asqf.cloudfront.net (CloudFront).’
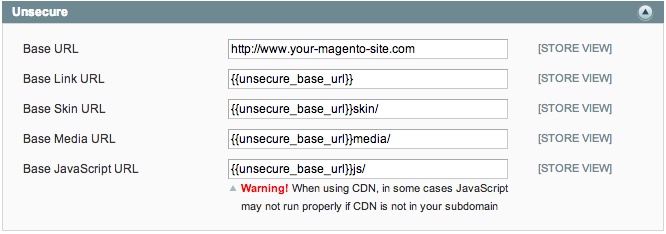
If the testing works fine, then it’s time to update your Magento system configuration to make use of CloudFront. Navigate to System > Configuration > General > Web, and an unseen area will appear called Unsecure, with following settings (below)
Change the Base Skin URL, Base Media URL and Base JavaScript URL settings according to your new CloudFront CDN CNAME.
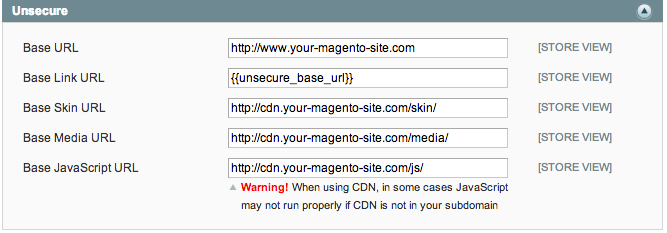
Save this configuration and any requests to your magento-site.com for media, CSS or javascript will be routed to the newly configured CDN URLs. If any request object doesn’t find on Cloudfront then it will go to its origin server, fetch the required object and cache it all over the CloudFront servers.
Save all those settings, your Magento store will now be using Cloudfront, the admin will be using the base URL, and your multimedia and your WYSIWYG editor will properly be functioning.
Voila, you have learned using how to set up CDN in your Magento. Got any query? Do Let us know in the comment section below.
Latest posts by Moiz Khan (see all)
- How to Use AI to Enhance your SEO Strategies? - August 31, 2023
- What You Need to Know About Test Automation in DevOps - August 30, 2023
- 6 Cloud Computing Challenges That Businesses Need to Be Aware of - August 22, 2023


