Latest Blogs
Software Development
Ramsha Khan
Dec 11, 2025
Why are HTML Templates the First Choice of Designers?
This is no new trend. Html templates are the first choice of designers. Making use of Html templates was first started in the initial stages of web designing. No matter how advanced web technologies are, HTML will always lead the way. Some few reasons for the obvious fame for HTML are,
The HTML templates are supported by every browser such as Google Chrome, Firefox, and Internet Explorer, Safari etc. it is mainly because this markup language is very adjustable and recognizable by many browsers which let you display your website on screen regardless of any browser. Html templates are also accessible from any devices either desktop, laptops or mobile.
Hear, hear, Html templates are SEO friendly. It is easy for search engines to read websites of such templates as their coding is organized. All in all, this method helps to get rid of complex problems.
Get free quote from Professional Website Design and Development Agency.
Html is easy to understand by beginners and non-technical person. Because of its pliable nature, developers and designers can customize it accordingly.
These are some top reasons as of why the HTML templates are the first choice of designers and developers. Now let’s see some top best Html templates (free or paid) to create some brilliant portfolio websites, software or product app landing pages and much more.
Fekra, sounds strange. Doesn’t it? The template is a single page parallax suitable for an amazing range of industries and niches. It is mobile responsive and has an unlimited color palette to make the most of this platform. It’s so affordable with 50 demos and lets you create 270 unique pages. Well, this template is the best choice for advanced users.
Professional HTML5 Development Company.

Metronic is the template enriched with varieties of functions and features. The theme consists of 7 admin templates, customer base of about 30,000 satisfied developers and also 1500 user interface features.
With a fully responsive capability, the template can be used for both professional and personal use. Do check it out and I am sure you’ll love the versatility of it.

With the increasing number of mobile users, BeMobile html template took the advantage of this growing trend and made specifically for the mobile users. The template is fully customizable with 10 different homepage styles, bar styles and features which works only for mobile and commonly found in mobile phones only. The design feature of the template consists of touch device optimization, CSS3 design, ergonomic navigation and also tablet-specific responsiveness.

Smart Start is considered to be an ideal template for beginners but it’s not true. We have seen the template is so much versatile for experts too. If you are a graphic designer and wants to make the most of the layered PSD files or can’t live without Ajax infrastructures then you are definitely going to love Smart start. It is compatible with all browsers, mobile responsive and perfect for both HTML 5 and CSS3 users.

If you wants to showcase or display artworks, products or services then this template is best for you. The Flex template quickly, responsively and elegantly portrays the message without boring the audience with too much content. The template has built-in SEO functionality and allows the implementation of metadata, tags and etc.

These are not the only best HTML templates but they are among them. Hence, it is now certain that HTML templates have their own identity in web designing and developing industry. Doesn’t matter how advance the web industry becomes, the value of this markup language can never be less.
Saima Naz
May 26, 2017
How to Avoid Sending Spam Emails in Magento
Every website owners are very much concerned about the emails being received by their users in their spam folders. People on different community forums are this major problem of emails being marked as spam so I thought to write up on this and shed some light on this topic for correct configuration and to create a checklist.
Obviously, this is no website owner goals to drop their emails into the spam folder. Emails are supposed to be sent to the inbox rather than in the spam. So, today I am going to tell you how to avoid sending spam emails in Magento.
First, let me describe you shortly as for how the spam filter works, not just for Magento emails but for every mail. Whenever any email received to your server, and the spam filter is enabled, it will check all the incoming messages for a list of parameters.
Get Free Quote from Professional Magento Development Agency.
The parameter can either affect final spam rating in the positive or negative way. Marking whether the email is a spam or not is based on final scores. Average and recommended score to mark any mail as spam is 6.6. If the score is low then it won’t be marked as spam but if the scores are higher then it will go to the spam folder. In this blog, we are going to discuss some most common reasons for the rise of spam score and will provide you some tips to reduce it. Keep in mind, the lower the score is, the more likely the email is going to be sent to the user’s inbox.
To decrease the possibility of the spam emails, be ensure the server is configured correctly and the DNS contains all the necessary records. The email message should contain required headers and MIME parts.
Configure the domain SPF record correctly. SPF record is basically a TXT record in the DNS which has a list of all the IPs and hostnames, authorized specifically to send emails from the domain.
HOW IT WORKS: When any receipt server gets any mail, it checks the IP address for the authorized address.
The mail server attaches a signature to every outgoing mail. The signature is used to verify sender server by reading public key located in the DNS record of the system. There are basically three parts: a private server, not visible to anyone on the server, used to generate email signature. A public key, listed in the DNS TXT record, used to verify that the email was signed with a private key of a specific server. But this point doesn’t stop spammers from sending emails using Google servers or others. This is just an additional layer of security.
Whether sending email from a server inside the domain, ensures that it has its own IP address and the hostname is resolved to that IP address.MX Record
MX Record is necessary for your domain. It basically tells which email servers is responsible for handling all the incoming emails for the domain. It is required if in case the email couldn’t get delivered to the receipt address, so the receipt server can send an undelivered notification.
Sometimes IP address can become blacklisted. After getting a new IP address from the provider, it is suggested not to use it for at least a month. The reason behind it is the new IP address might also be used by someone else. This time delay will clear the IP address and becomes “white”.
One of the good solution to use SMTP server to send emails in Magento. It can either be public or private mail sector. Some paid SMTP services are also available on the web. Magento does not work with SMTP, so one need an extension for it. But here is one drawback, there are only a few extensions available in the market which send emails using their own method and will not work through SMTP. Also, maintain the server to ensure it works correctly and is backed up often.
The first part is completed, the server is now configured and is all ready to send emails out. Let’s move towards the second step and look at the email messages structure.
The biggest problem in Magento is it doesn’t send the text part. It only sends HTML message part, giving such messages a higher spam score. The text can either be entered manually or can be created automatically.
One can’t imagine an email without images. It is better to embed images directly into the message instead of linking them from remote resources.
The text is important and useful for the readers. Bring value to it. Don’t do marketing for profit only. Don’t ever forget that your emails are read by humans.
Avoid sending emails consisting a single image. It is no doubt hard to code email markup sometimes.Because single image emails are always considered as spam.
Link shorteners can help you in building nice URLS because it is considered untrusted. Your email will get up to 2 whole points for spam if any shortened link is found inside the email.
Testing Emails Messages in Magento
Checking email in all apps is not possible to do manually. To get it done, you can use third-party services like litmus. It will generate previews of the messages on different platforms, web and desktop email clients. It is a very useful tool.
Once you are done with automatic testing, we would recommend you to send few copies to your circle, to get real life experience and feedbacks from live people.
Don’t ever forget to test the mobile view for Magento emails. Mobile marketing is continuously growing so the emails should look perfect on mobile devices too.
I hope this information comes handy to you. Got any more questions? Do comment below and I’ll be happy to help.
Saima Naz
May 24, 2017

4 Best Online Places to Learn Code for Free
A few years back, there was a time when programming was considered as the geekiest thing ever. But that’s not exactly the case for today. Nowadays everyone holds a certain level of potential, the chance to learn and even can master programming languages easily.
So, if you are new to the world of programming, coding and web development, then it does make sense to start teaching yourself by utilizing all the free resources available online. Forget about all the complicated setups and cold command prompts and say hello to these 4 online places for instant and interactive lessons to teach you the programming languages, website and app development, tips and even best practices of the industry top professionals.
To make learning easier, I have gathered here top 4 resources for you to learn the code free online. Let’s kick-start the path into programming and coding today.
Codeacademy is no doubt a famous learning source to teach you to code interactively. All thanks to codeacademy’s helpful interface and well-structured courses. Opening the main page, you can already start seeing and tasting the programming right away with its attractive on-screen console. Pick any of the courses that Codeacademy offers which includes Web development, PHP, Javascript, JQuery, Python, Ruby and APIs.

In every lesson that codeacademy gives contains a panel that explains necessary code and interaction. Another advantage of the panel is that it allows you to write acceptable code and then it checks if you are doing right or not. Not to worry about the mistakes you make while coding as both the instructions and code panel will warn you about the errors and will give you hint to solve. Learning with codeacademy will make you feel like as if there’s a teacher sitting right beside you.
Khan Academy, although not structured like other resources, but it does offer an open playground for everyone, particularly who are interested in learning drawing, animation and user-interaction with code. It doesn’t offer any specific programming language to learn, but the coding technique can be applied anywhere since all the languages share the same programming pattern.

First, join the basic programming courses to learn and understand the basic concepts and then discover the code to after the video tutorial to clear the doubts. With the Khan Academy tutorial, save your modification as a spin-off to enjoy and customize. There are hundreds of spin-off from one lesson in one course, so you can imagine well the community size of Khan Academy .
SQL is the language designed to save and retrieve the data from the databases. Learning with SQLZOO will kill the boredom for you to learn SQL happily with its interactive interface and smileys.

There is nothing really deep or impossible to learn or explain this straightforward language, the site will make you learn how to replace the variables and some more advanced queries. One biggest drawback about this tutorial is the shortage of hints, answers, and forum, so you can probably get lost if you are failing to answer any of the quizzes.
Once you are done with your basic learning and wants to expand your skills and capabilities, Code School is the best place to learn from. Unlike other interactive sites, Code Schools give you an in-depth learning and training to make you an expert with the help of industry’s best practices.

The courses offered in CodeSchool are categorized in 4 main parts which are:
Most of the courses offered are free and few of them are about $25/month for the entire course.
Missed any or know any other resources better than those above one, then do let us know in the comment below. Also share your experience about these resources as well.
Saima Naz
May 20, 2017

5 PHP Security Measures to Implement
PHP is the most popular programming language and is being widely used for rapid development of dynamic websites. Web servers are publically accessible, so they possess possible security vulnerabilities.
PHP is a stable and almost an inexpensive web application platform. Like other web-based platforms, PHP is unsafe from external attacks too. For this, developers, database architects, and system administrators should take measurable precautions before deploying any PHP applications to a live server. These security techniques can get done with a few lines of code or some little adjustment to your application settings.
In this blog here, I have described in detail some of the most common vulnerability found in PHP web applications along with suggestions as for how they can be managed and prevented.
SQL injection is the most common hacking type and specifically targets the database-driven websites or web applications which link or interacts with databases. The SQL injection is a type of code injection, where attackers make full use of the vulnerabilities in the website security measures to send special SQL queries to the database which can modify it and tables within it or delete the whole database.
Get free quote from professional PHP Development Company about your project.
This type of attack occurs when the developers fail to check data validation functionality in those areas of the website where the data from external sources can be inserted into the website. The attacker can easily add their own SQL statements in unprotected SQL queries which utilize data submitted by the user to check for something in the database.
An unprotected statement would be something like this
| 1 | $query = “SELECT * FROM users WHERE username = ‘niki’”; |
An SQL injection query will result in the following attempt:
| 1 | $query = “SELECT * FROM users WHERE username = ” or ’1=1′”; |
The result generated here will be true, and thus the content of entire table users would be displayed.
[related_posts]
In the SQL injection, attackers gains access to all the information in the database such as passwords, usernames, emails, and some other sensitive information.
Remote File Inclusion and Remote Code Execution
The violation of this security measure will allow malicious or even unknown third party to run any code on the web server or on the client side and can even lead to other hacking attempts.
Remote file inclusion caused by a website susceptibility which lets the hackers to deploy malicious file on the web server. This can happen because of improper use of require() and include() functions if the register_globals directive, is ON, allowing the user to initialize variables remotely. These remote variables can be used to include malicious or unwanted files from remote locations, and if the allow_url_fopen is enabled in php.ini, then remote files can also be uploaded to the site’s server via FTP or HTTP from any remote location.
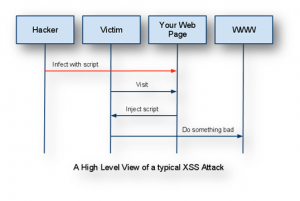
Cross Site Scripting is one of the most common forms of hacking Hackers use a legitimate site’s vulnerability to forcefully makes the site to do certain things. In XSS, the hacker infects a web page with the malicious client-side script and whenever a user visits that page, the script gets downloaded into the attacker’s browser and executed. The pattern of XSS attack is depicted in the diagram below:
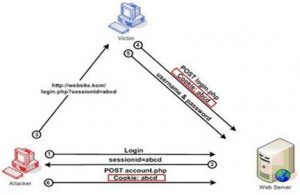
The session and cookie hacking can’t violate the database or the web application itself, but it can affect user accounts. A session is an entity triggered when users establishes contact with any web server and consists of some period of interaction between users and web application which may be authenticated using security measures like a username and password. In all this session, the web application stores a cookie or file on the user’s’ browser, which contains information about the session such as users’ preferences, authentication data, unique codes or shopping cart information and more.
Directory aka Path traversal is a method of destroying web applications by accessing the files from the document root directory which allows attackers to view restricted files and interact with the web server by executing commands. This hacking attacks happens from the browser and get done by entering URL into the address bar which helps to let out of the root directory and into the main server directories. This attack can also be done through input portals on the front end of the web application.
Security is an important phase in all the process. In this blog, I have mentioned here the top five PHP security measures to follow. Still got questions or need more information? Do comment below.
Saima Naz
May 19, 2017

How To Install Drupal Commerce KickStart
Drupal is among the powerful CMS which is used to create a variety of websites without the need of knowing coding. Drupal is an open source like WordPress and supports modules instead of plugins as in WordPress to extend the functionalities.
The useful way a Drupal can be utilized is by creating an e-commerce website. In this blog guide, I am going to use Drupal 7 since it is one of the widely used versions of Drupal. The two ways through which a Drupal e-commerce website can be made are:
Drupal commerce is not just a framework. It is an application since it is made on the ideology of what can be built using it.
Drupal commerce lets you build from scratch and takes an in-depth knowledge as you have to configure every aspect and module of it.
Drupal commerce kickstart is a Drupal distribution. Distribution offers site features and functions for the specific site since a single download contain the Drupal core, shared modules, themes, and pre-defined configuration. Making it possible to quickly set-up complex, use-specific site in fewer steps if you are installing and configuring elements individually.
This is very helpful for any user who wishes to kick-start their e-commerce website and run in short period of time and do not wishes to go in depths of Drupal.
Get Free Quote and Avail Drupal Development Services.
I am going to use Drupal commerce Kick start in this blog after all this is specifically for users who are new to Drupal. So let’s not wait and dive right into it.
A distribution is installed in a similar way as of Drupal’s core installation. The step involved in the installation of Drupal Commerce Kickstart are:
Check the Commerce Kickstart site and read the whole page. The download links can be seen on the bottom of the page. Click on this highlighted link to get more detailed download links.

Here you will get an option to download the distribution with or without the Drupal core. I am downloading it with Drupal core as it is the simpler method. This will install the distribution along the Drupal core. The installation is done in the same way as the Drupal core would.
Decompress the file you downloaded into the website’s root folder. And ensure to place the entire folder, and not to forget the hidden .htaccess file.
Go to database manager and create a new database.
Don’t forget the name you keep for the database and remember it during installation of the distribution.

Once you are done with this, open the web browser and navigate to the root folder (as we are building the website on the root folder, go to http://localhost/). If you follow these steps rightly and get the things correctly done then you will be presented with this screen (below).

Agree to all the terms and click on the “let’s get started”
After verifying all the requirements, a “set-up” database screen will pop up. Here you have to set up your database name. The name should be same as you set earlier for the database created in the database manager. Set the database username and password as well.

Fill out all the required fields and click on the “save and continue” button.
This will install Commerce Kick start 2 and a configure site screen will appear.
Here you have to enter your site information, site maintenance account and server settings. After filling out all the required details, click on the below blue button.

Now, time to configure the store. You will get an option to download the demo store, but do remember once you install the demo store, you cannot remove it without reinstalling the entire site again.
Additional features will also be presented to enable modules which allow various functionalities like setting slide show for front page, enabling of social media connections etc. Set all these options according to your choice and proceed to the next step.
The screen will display a simple progress bar, indicating the import of contents on your site.

Once you are done with this, you will be transferred to “Get Started” screen, where a short intro of the website you created will be given to you. And if you got any queries then navigate to the “help” tab.

That’s all. You are done! You have finally created your first Drupal commerce site. This above guide is for beginners so we used a distribution with Drupal core which is already included in it. This is the simplest method to install Drupal commerce kick start. I hope this blog guide will help you.
Saima Naz
May 15, 2017

Things to Consider Before Any Magento Big Data Migratio...
Magento 2 is finally here, after such a long time. Though the wait was worth it because this latest Magento version is built on some different architecture and is more optimized, fast and user-friendly than Magento 1. So, if you are planning to build a new Magento store or thinking to migrate from Magento 1 to Magento 2, this blog is here to help you out.
So if you are currently using Magento 1, then the release of Magento 2 will put you in a bit of dilemma and confusion as to whether you should stick to Magento 1 or migrate to Magento 2. In this blog here, I’ll briefly discuss the big data migration process from Magento 1 to Magento 2, and all the key points you need to consider while migrating.
The very first thing you need to be cleared on right away is whether you want to stick with Magento 1 or wants to start the migration to Magento 2 now. Here are some important key things to consider while making your decision.
Get Free Quote From Magento Development Agency
Here is some brief overview of the steps involved in the big data migration and transferring of your site from Magento 1 to Magento 2.
Take a good look for the availability of the deisred extensions and themes. Ensure that they are available in Magento 2. Also, do look for unrequired extensions you can drop, along with the database asset you need to migrate or any else asset to drop.
Check out your hosting company whether they have the required capacity to host your Magento 2 site without causing trouble and also if they can sustain and support your Magento 2 site when the traffic scales up.
Create the fresh installation of your Magento 2 and after the installation is done, back up or dump the Magento 2 database as soon as possible.
Now, start the installation of your required extensions on the fresh Magento 2 store.
Install Magento migration tool and ensures that it has the access for both the databases of Magento 1 and 2 to start the migration process.
Stop all the cron jobs and activity in Magento 1 admin panel. And don’t start or resume the activity unless the whole migration process is completed and your Magento 2 site goes live.
Transfer the media files from Magento 1 to Magento 2 manually and use Magento migration tool to migrate all the settings to Magento 2.
Use the migration tool for the complete transfer of Magento 1 database to Magento 2. Though both databases have different structures but the migration tool knows how to transfer properly, so your data remains accessible in the installation of Magento 2.
But if you are using any extension which uses its own data and has different database structure for Magento 2 then while transferring it to Magento 2, use the mapping files which comes with the data migration tool.
Once you are done with the complete database transfer, do reindex your Magento 2 site.
And lastly but not the least, do conduct a thorough testing of your new Magento 2 site.
Now it’s time to migrate the data which uses incremental updates.
Once you are ensured that all the data has been completely transferred to Magento 2 and everything is working fine then it’s to make take your Magento 2 to live now. For this, put Magento 1 site first on maintenance mode, stop migration tool, start Magento 2 cron jobs and point the DNS load balancers to the new production hardware. And voila you are done!
The flowchart displayed down here explains the steps for migration.

This is just an example overview of the overall migration process to help you plan properly.
Here are some best practices to keep in mind.
Now let’s give you an estimate of the professional Migration process time. Any Magento store hosted on VirtualBox VM, CentOS 6, 2.5Gb RAM, CPU 1 core 2.6GHz environment, with database of around 177k products, 355k orders, 214k customers can take around 10 minutes to migrate settings and 9 minutes to migrate the data, and the Magento site has to remain in maintenance mode for few minutes to reindex the Magento 2 site and to change the DNS settings.
The migration tool can be very helpful for migrating the data and settings to Magento 2. But not all your data can be transferred with this tool. There are basically three types of data which need to be transferred manually.
Before installing the migration tool, ensure you have covered all the above steps. Once you are done with all this, use below instructions to start the installation
Log in to the Magento site server as a user with the access to edit and create files
Go to Magento 2 root directory and enter the command (below) to update the composer.json file first
composer config repositories.magento composer https://repo.magento.com
Now enter the (below) command to access the current version of the package.
composer require magento/data-migration-tool:2.0.0
The command will install the version 2.0.0. Of the package. If you want to use any other package, you can set the version in the command.
Wait till the dependencies are installed. Once you are done, enter these below two commands to install the migration tool.
composer config repositories.data-migration-tool git
composer require Magento/data-migration-tool:dev-master
When these commands will be run, it will ask you for authentication keys. For the public key, enter the username and for the private key, enter the password.
This will install Magento migration tool on Magento 2.
In this blog, I tried to explain whether if it’s a good decision to migrate to Magento 2 or not. Also, an overview of the migration process is given in this blog with some tips and best practices for the migration process. Follow this blog to clear your mind for creating a migration plan of Magento 1 to Magento 2.
Saima Naz
May 5, 2017

How To Setup Zend Framework 3 On Cloud Hosting
Zend is one of the popular PHP frameworks. In all the cases, the performance of the Zend framework is completely dependent on the hosting of the project. In various cases, managed cloud hosting is considered the best option for the Zend framework.
Many users don’t know how to install Zend framework 3 on cloud ways. Here’s how you can set up your Zend framework 3 on cloud hosting by following our complete detailed guide of Zend framework hosting on cloud ways.
Zend is an open source PHP development framework. Zend supports object-oriented programming and consists of a huge library of components and packages which can be installed and used independently. Zend framework is the most stable and latest version which supports PHP 7.
Let’s start with the installation process.
To setup the Zend framework on the cloud, you need to make an account. Arpatech provides managed cloud hosting services which are robust and the most reliable hosting service for website owners and e-commerce stores. If you do not have your cloud account, get your managed cloud hosting here.
Log in to your cloud account and create the server. Fill in the server and the application details. Select PHP stack as the application and provide your application name. Server name and other project details. Select your cloud provider, scale the server size according to your requirements, choose your location and launch the server. In less than few minutes, your cloud server and your application are ready to work.
Since your application and server is ready, open the server now by clicking the server name.
Next, click on the Launch SSH Terminal button, as displayed in the screenshot below.
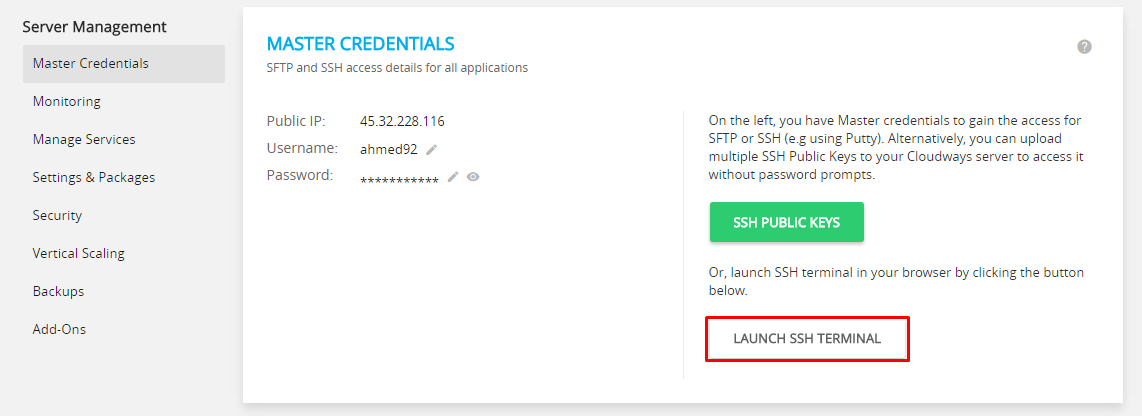
Log in with the username and the passwords provided in the Master credentials.
To install the Zend framework 3, go to the application folder, to go to the application folder, type the following commands.
cd application
ls
cd your application name
cd public_html
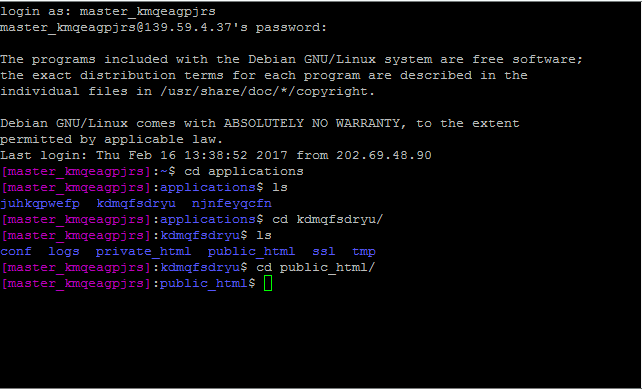
Type these following commands in order to start the installation of Zend framework 3.
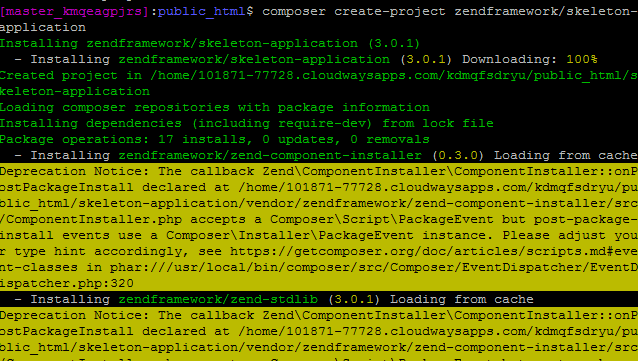
composer create-project zendframework/skeleton-application
The installation of Zend framework 3 will start and you can see the process on the screen.
Several seconds later of installation, a dialog box will appear asking you the question: you want a minimal install? (With no optional packages) Y/N.
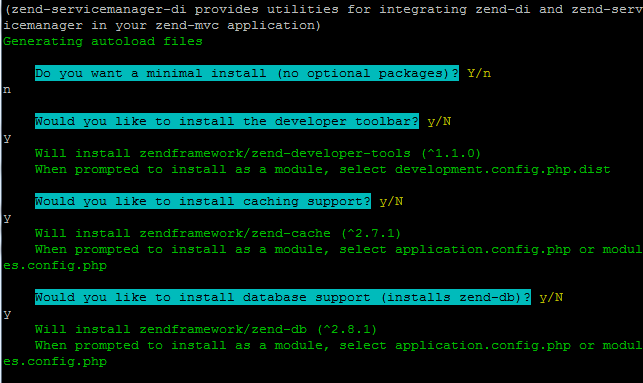
After answering the question, it will ask you about component installation. The installation will generate prompts for individual components and you can answer to them according to your requirements.
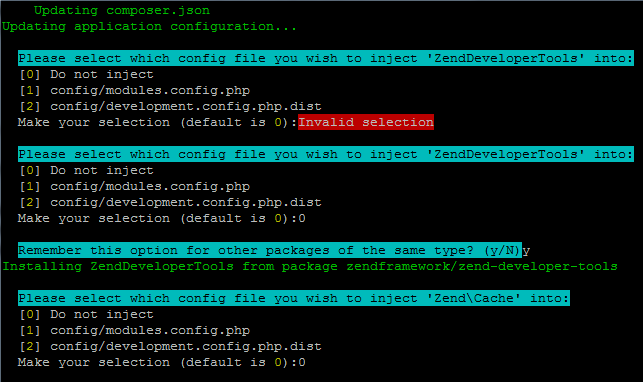
Next, the installation will ask you which file to inject, but for now, do not inject anything and select 0 for all.
Please select which config file you wish to inject ‘ZendDeveloperTools’ into:
[0] Do not inject
[1] config/modules.config.php
[2] config/development.config.php.dist
Make your selection (default is 0): 0
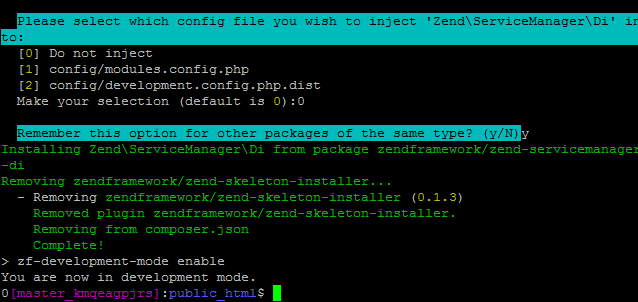
Finally, the following prompt will display on the screen.
zf-development-mode enable
You are now in development mode.
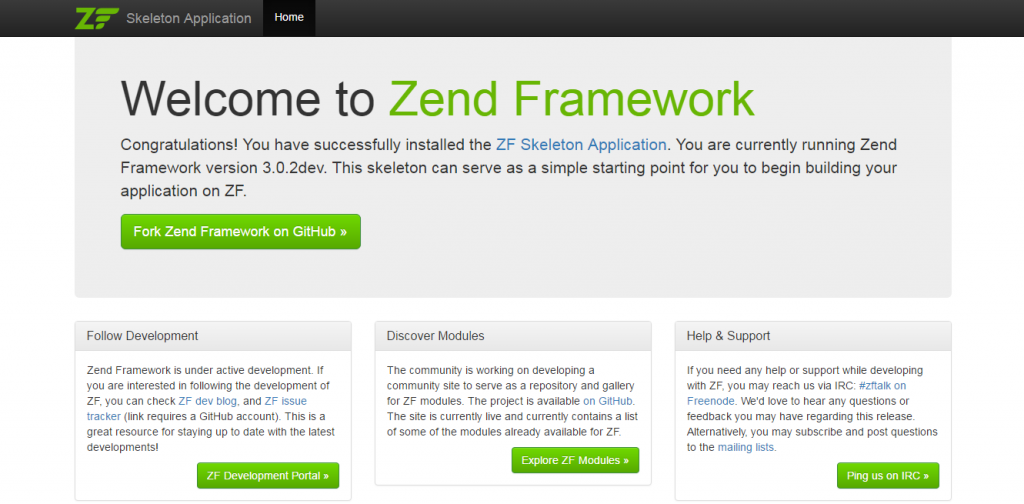
At last, the whole installation process is over now, it’s time for you now to launch the application from the menu.
Click on the launch application.
Don’t forget to append the /skeleton-application/public/ to the URL.
And you are done. Your Zend framework 3 development application is now live.
In this tutorial, I tried to tell you in the easiest way as how to setup the Zend framework 3 on cloud hosting. I hope that you find this tutorial a helpful one. Do comment below if you are in seek of any help or would like to take part in the discussion.
Saima Naz
May 4, 2017